
October 16, 2013

The overuse and abuse of Photoshop filters is a hallmark of amateur design (lens flare anyone?). However Adobe didn’t spend all that money developing powerful filters just so Joe Blow could rasterbate all over their blank canvases. If used properly and sparingly you can achieve very powerful effects in very little time.
In this article we are going to create an elegant water ripple effect using a combination of stock images and the Displace filter.
Find yourself a water texture you like, I am using a nice top down water ripple texture I found over on CG Textures. A nice logo or graphic you want to ripple. And a texture to act as the ground beneath the water.

First create a new document in Photoshop, the dimensions I will be using are 1680 x 1050. Bring your water ripple texture into this new document, scale it so that it fits within the document bounds, and duplicate the layer.

Rename “Layer 1” and “Layer 1 copy” “Displacement” and “Original” respectively. Hide the “Original” layer and desaturate the “Displacement” layer by selecting it and navigating to Image > Adjustments > Desaturate).

Now apply a Levels (Image > Adjustments > Levels) adjustment to the “Displacement” layer with the slider values of 40, 0.60, and 255.

Next adjust the Brightness/Contrast (Image > Adjustments > Brightness/Contrast), set to Brightness 0 and Contrast -50.

Now save this as Displace.psd. The Photoshop Displacement filter requires a PSD file input. The Displacement filter uses a flattened grayscale image to shift the pixels of the target layer horizontally and vertically. The concept is similar to how a displacement map is used in 3D modelling.
Next save your working file to something other than Displace.psd and bring in your other elements. In the example I have the “pebbles” layer below the “Displacement” layer and the Kelowna Website Design logo below the “Original” layer.

Now for the fun bit! Select your logo layer and then navigate to Filter > Distort > Displace. Set the Displacement Map to Tile and Undefined Areas to Wrap Around. Then select the Displace.psd you saved out earlier when prompted.

You may need to tweak the horizontal and vertical scales until you get a result you like.

Now apply a slight Gaussian Blur of 1.5 to the logo. This will help give a sense of depth in the final image.

We need to add another Displace filter to our riverbed texture (which in my case is a bunch of smooth pebbles). To imply depth we will increase the horizontal and vertical scales considerably. You will also need to make sure that you have Stretch To Fit and Wrap Around selected for this one. Use the same Displace.psd you saved earlier.

And then apply a stronger Gaussian Blur to the texture.

Now it is time to start bringing this all together! First turn on your “Displacement” layer and set its blending mode to lighten. You may also want to tweak the “Displacement” layer’s contrast if you want sharper highlights from your ripples.

Next up, turn on your graphic layer (in my case it’s the “KWD logo” layer) and apply a Drop Shadow layer effect. This will help make it pop.

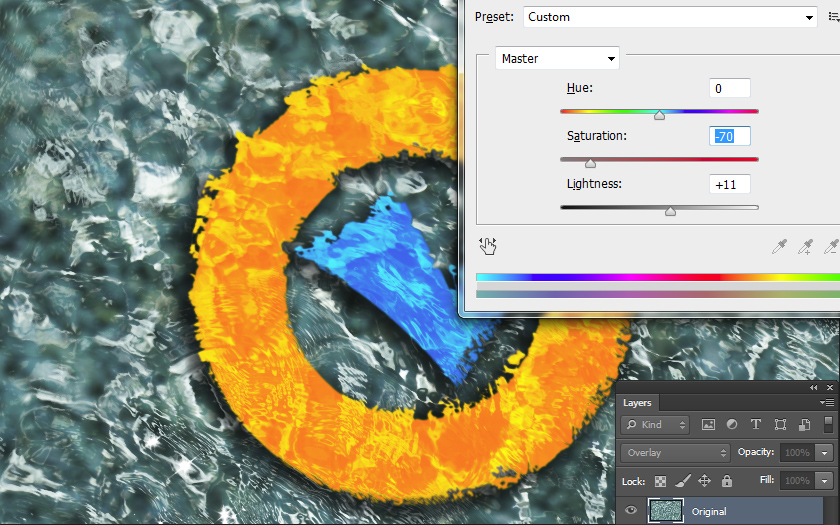
Almost done. Now turn your “Original” water layer back on and set its blending mode to Overlay. Depending on the saturation of your water texture you may need to adjust its Hue/Saturation levels. I brought my water texture down to -70 saturation and +11 Lightness.
After a few colour adjustments the end result should look something like this:

I hope you have found this short tutorial helpful. And remember — when using Photoshop filters subtlety is key!
~B-Man
Tags: 1680x1050, Adobe, cg textures, CS5, CS6, desktop wallpaper, displace filter, effect, filters, photoshop, photoshop filters, ripple, wallpaper, waterCategorized in: Graphic Design


Comments are closed here.